At work, we’re using a gitolite server to store all our projects. However, because the current server is rather slow and gitolite is pretty cumbersome to use, we wanted to migrate to Gitlab.
However, being the geek that I am, doing this manually didn’t appeal to me. Instead, I took it as an opportunity to learn more about scripting and to create a migration script.
It turned out very well, so I ended up setting up the entire migration with the following steps;
- Create and configure a Gitlab instance.
- Create a temporary directory to hold everything.
- Create Gitlab repository from command-line.
- Clone a repo, add remote and push to Gitlab.
- Get a list of all your repositories.
- Putting it all together
- Grab a coffee ☕️
1. Create and configure a Gitlab instance
The first step in migrating to Gitlab is creating a Gitlab instance.
To achieve this, I used the quite excellent and rather cheap Digital Ocean to host my Gitlab instance. Their One-Click Applications make this easy. You can check out the tutorial here. Of course, if you set up your own Gitlab instance, you can use that one instead.
2. Create a temporary directory to hold everything
While creating the script, we’re mostly working with small script files. Because these scripts will be calling each other, and we don’t want to bother with adding them to our PATH, we create a new directory migration that we’ll use to store and run the scripts from and to serve as a temporary directory for the migration files. After the migration, we can delete the directory if we like.
3. Create Gitlab repo from the command-line
Since we have a lot of repositories, creating a new repository for each one manually would have been a lot of tedious work. Instead, we’re going to retrieve a list of all the repositories we have access to and create repositories on the fly.
First off, let’s create a script that allows you to create new repositories from the command line. Here’s the gitlab-init-remote we’ll will be using, which I adapted from this script by Nate West.
#!/bin/sh

if [ "$#" -ne 3 ]; then
  echo "Usage: $0 GITLAB_URL API_TOKEN REPO_NAME" >&2
  echo "For example: $0 your.gitlab.com yoursecrettoken a-cool-repo"
  exit 1
fi

GITLAB_URL=$1
API_TOKEN=$2
REPO_NAME=$3

curl -v -H "Content-Type:application/json" $GITLAB_URL/api/v3/projects?private_token=$API_TOKEN -d "{ \"name\": \"$REPO_NAME\" }"
Create and save this script somewhere. Don’t forget to make the script executable by running chmod +x gitlab-init-remote.
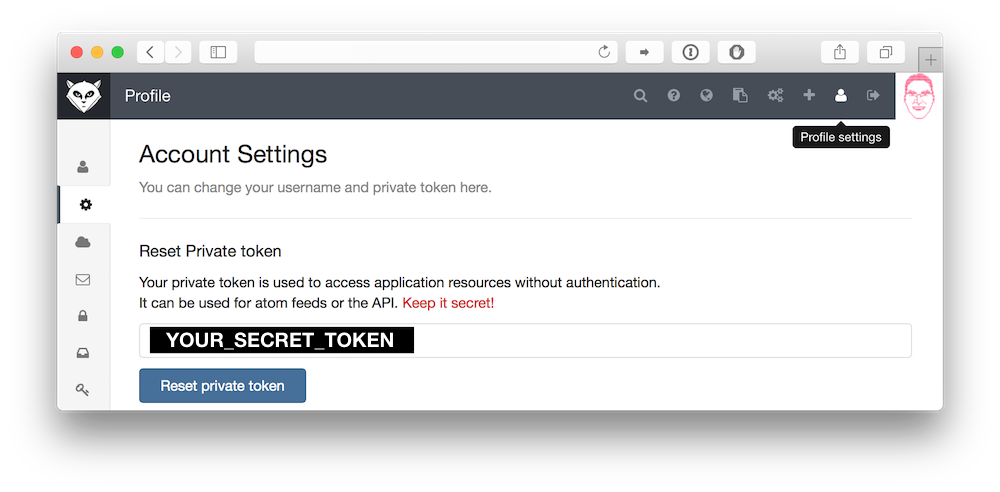
Second, we need our API token. You can find your API token in your Gitlab user’s Profile Settings > Account Settings.
Now, let’s test this out.
./gitlab-init-remote http://your.gitlab.url YOUR_SECRET_TOKEN my-cool-repo
If all goes well, you should get a json response with the information about your new repo named my-cool-repo!
4. Clone a repo, add remote and push to Gitlab
Now that we have a repository ready in Gitlab, it’s time to clone and push the a gitolite repository to Gitlab. To avoid any issues and to make sure we got everything, we’re going to clone fresh copies of all our repositories, add a gitlab remote to them and push it all to Gitlab. This blog article by Tyler Hall helped me with the commands.
We’ll create another script, called gitolite-repo-to-gitlab;
#!/bin/sh

if [ "$#" -ne 5 ]; then
  echo "Usage: $0 GITOLITE GITLAB_URL API_TOKEN GITLAB_USER REPONAME" >&2
  echo "For example: $0 git@your.gitolite.com your.gitlab.com yoursecrettoken a-cool-repo"
  exit 1
fi

GITOLITE=$1
GITLAB_URL=$2
API_TOKEN=$3
GITLAB_USER=$4
REPO_NAME=$5

git clone --mirror $GITOLITE:$REPO_NAME.git
./gitlab-init-remote $GITLAB_URL $API_TOKEN $REPO_NAME
cd $REPO_NAME.git
git remote add gitlab git@$GITLAB_URL:$GITLAB_USER/$REPO_NAME.git
git push -f --tags gitlab refs/heads/*:refs/heads/*
cd ..
Don’t forget to chmod +x gitolite-repo-to-gitlab, before testing it out;
./gitolite-repo-to-gitlab git@your.gitolite.com http://your.gitlab.url YOUR_SECRET_TOKEN username my-gitolite-repo
If all went well, you just cloned your repository called my-gitolite-repo and pushed everything to Gitlab. Success! We’re almost done.
Caveat: Before continuing, delete the entire my-gitolite-repo from Gitlab. gitlab-init-remote fails if the project already exists and we’re not doing any proper error handling at the moment. So that would stop the entire migration.
5. Get a list of all your repositories
Now we want to retrieve a list of all the repositories we have access to. If your gitolite installation is anything like mine, you can retrieve all the repositories you have access by running ssh git@your.gitolite.url info. You’ll get a response that resembles this;
hello bruno, this is git@your.gitolite.url running gitolite3 v3.04-10-g31166e1 on git 1.7.3.4

 R W	ProjectOne
 R W	ProjectTwo
Note, I was using a rather old version of both gitolite and git, so your output is probably different. To go from this output to a list of project names, use the following command (with many thanks to terlon for his help):
ssh git@your.gitolite.com info | awk '/^[ @]*R/{print $NF}'
We’re going to put this in the script file gitolite-repo-names
#!/bin/sh

if [ "$#" -ne 1 ]; then
  echo "Usage: $0 GITOLITE" >&2
  echo "For example: $0 git@your.gitolite.com"
  exit 1
fi

GITOLITE=$1

ssh $GITOLITE info | awk '/^[ @]*R/{print $NF}'
Again, create and save this script, this time in the same directory as gitlab-init-remote. Use chmod +x gitolite-repo-list to make it executable and try it out! You should see a list of repository names.
Caveat: The only thing that this won’t account for, are logical repositories, e.g. user/repo. You can’t use / in a repository name in Gitlab, so every one of those repo names would fail. However, I don’t have any of those, so those don’t bother me. You may want to figure out a way to fix this if you do use them.
6. Putting it all together
Finally, we can put the entire migration together. We can use the names of all projects in gitolite and use those to migrate them all to Gitlab. To do this, we create our final script, gitolite-to-gitlab-migration;
#!/bin/sh

if [ "$#" -ne 4 ]; then
  echo "Usage: $0 GITOLITE GITLAB_URL API_TOKEN GITLAB_USER" >&2
  echo "For example: $0 git@your.gitolite.com your.gitlab.com yoursecrettoken a-cool-repo"
  exit 1
fi

GITOLITE=$1
GITLAB_URL=$2
API_TOKEN=$3
GITLAB_USER=$4

./gitolite-repo-list $GITOLITE | while read REPO_NAME
do
./gitolite-repo-to-gitlab $GITOLITE $GITLAB_URL $API_TOKEN $GITLAB_USER $REPO_NAME
done
Run chmod +x gitolite-to-gitlab-migration and then we’re ready to start our migration!
./gitolite-to-gitlab-migration git@your.gitolite.com your.gitlab.com YOUR_SECRET_TOKEN username
7. Grab a coffee ☕️
This is going to take awhile. So grab a coffee and relax.
When the migration is done, we’re left over with the migration directory, which contains all your scrips and all the cloned repositories. You’re free to delete all of those now.
Congratulations! We finished our migration!
Improvements
This blog post documents my first attempt at creating proper shell scripts to accomplish a goal. However, this also means I didn’t spend much time on the finer points of script design. How could all of the above be improved?
- Put everything in one script.
- Better validation for the command line arguments for every script.
- Proper error handling; e.g. not breaking if a repository already exists.
- Delete the cloned repository after each migration.
If you enjoyed this article, or have some criticims, you can contact me at @brunoscheele on Twitter. I would love to hear from you :)